söndag 23 juli 2017

Cart UV Updates

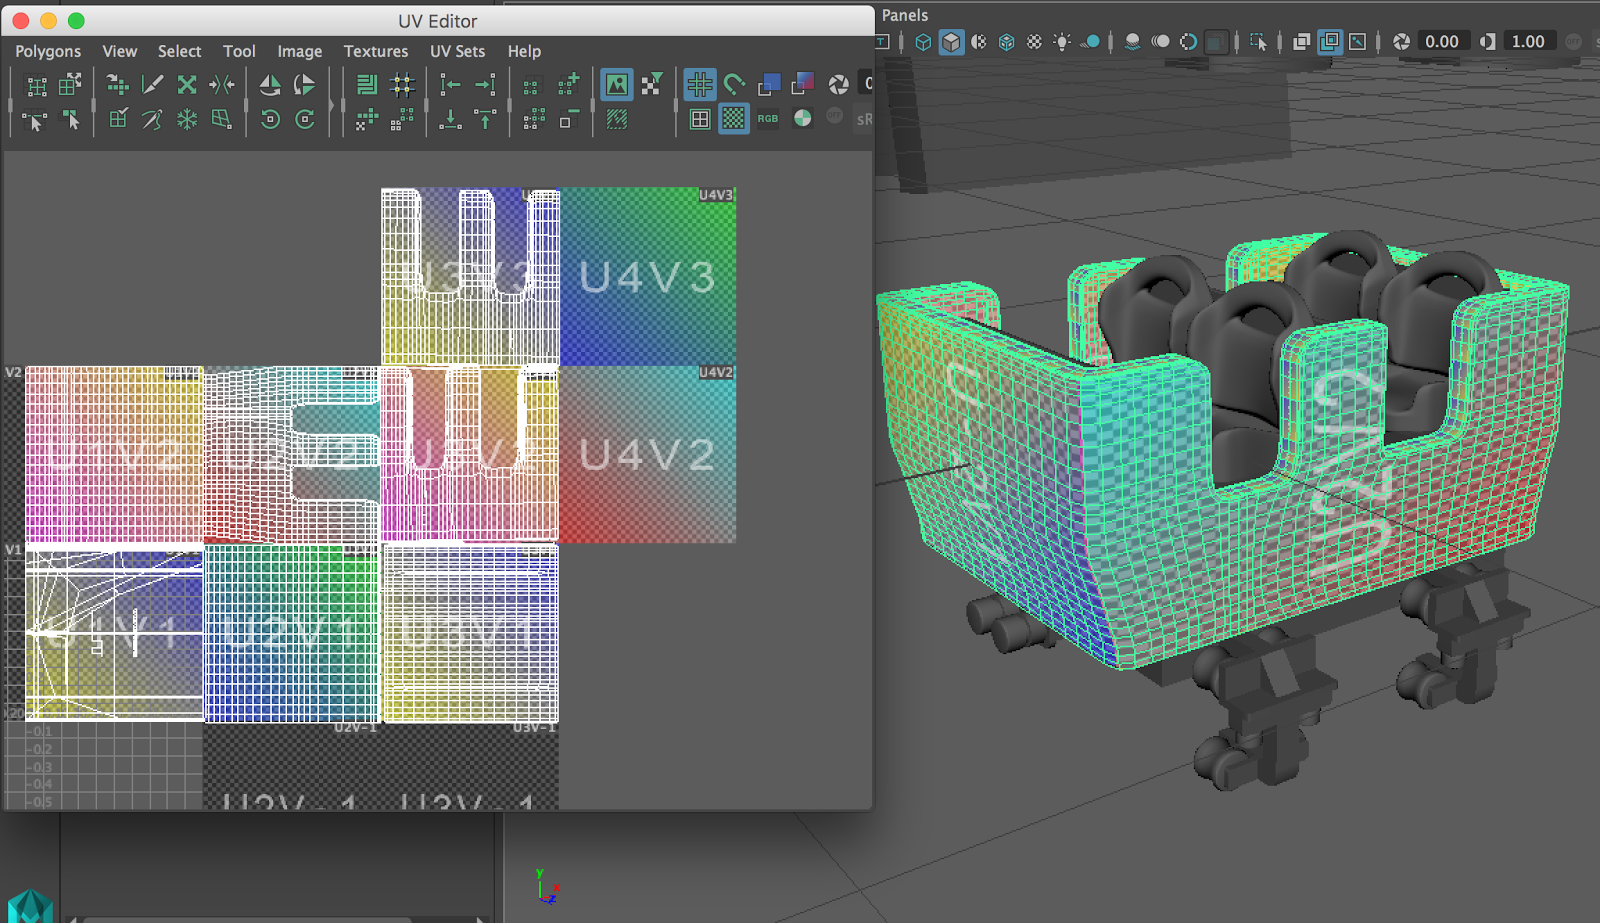
A UV mapping has been created for the shell of the front cart. The layout of the UV mapping for the back cart was updated as well to be more similar to the front cart's mapping.

The UV mapping for the front cart shell.
The new UV mapping for the back cart

New Track

A new track was created to make a more exciting roller coaster. The track was created by extruding the three rails along a curve. The supports between the rails were added afterward, using an animation snapshot (like the original technique we used) along the same curve.

The new roller coaster model, imported in Unity.
The track was imported into Unity and the carts were added to see how they would move along the new track. This did not work very well, however, as the carts failed to gain any momentum from the steeper fall in the track. To mitigate this, a script was created which gives the carts a target speed. Triggers were then put at different places on the track which changes the target speed.

Triggers on the track that changes the target speed of a cart.
After this, the Animation worked well. While the movement of the carts is still physically based, it is slightly modified at specific key points of the track to get a more natural animation.

tisdag 4 oktober 2016

Texturing: Seats

UV-mappings were created and optimised to have as few visible seems as possible. A separate mapping was created for the top part of the seat and one for the lower part. The UV-mappings for each part can be seen below:

UV mapping for the lower part of the seat.
UV mapping for the top part of the seat.
The lower part of the seat has small patches of UV faces not connected to the rest of the UV, those parts of the model are not visible. For the top part of the seat the corresponding horizontal box area (just below the separate UV faces in the first picture) of the UV mapping is instead merged with the rest of the UV mappings, creating the convex "ear" shapes in the UV mapping seen in the second picture. This is done to ensure that the seem on the sides of the model are removed, which were otherwise in risk of being seen.

måndag 5 september 2016

Texturing: Revamp

As the UV mapping was finished during last Maya session (see blog post "Texturing") the final cart texture was imported into Unity and a seamless texture was applied. A fully seamless texture, as the one shown down below, gave promising results to the cart model after the UV mapping. However, as soon as we wanted to apply custom textures made by us the results suffered a bit due to not having full control over the UVs created, and the positioning of the mappings.

Example of a seamless texture with no text properties.
So I was forced to take precautions by revisiting the Maya files and create more clean textures that were easier to have custom textures and perhaps texts applied to them. Even pieces with correct size attributes were created. The final results and UV mappings are shown in the pictures below.


Complete UV mapping of the cart shell.
Complete UV mapping of the wheel suspension, applied to all four.

Complete UV mapping of the cart wheels, applied to all 16. Smaller wheels (located above the big wheels) were also separately UV mapped.


torsdag 7 juli 2016

Texturing

In order to be able to apply nice textures to the cart models in Unity, there are some necessary steps to take. If any texture was applied to the finished models, without these steps taken, the texture would appear as "smeared" upon the whole rigid model - creating an uneven and pixelated surface to the model.

To eliminate this issue, we will use UV mapping tools within Maya that create pixel mappings on the faces of the 3D models. The cart models will have their surfaces split into suitable face partitions. The key here is to make sure to include all the face elements of a model, or risk getting an uneven surface mapping that will most likely affect the texture quality later on in Unity.

Cart model after UV mapping applied.
Once the surface has been divided into smaller face parts throughout the 3D model it is time to move on to the next step: checking the quality of the created texture mapping. Luckily, Maya has a neat feature called "checkered tiles" that will display a checker board with various colors, functioning as a generic texture. With this tool it is now easy to spot any uneven splits, size issues, or any other kind of unevenness to edit prior to exporting the texture-ready model. With the checkered tiles mode activated, each face part can easily be moved to a specific checker board for checking consistency with the rest of the model faces.

Checkered tiles mode activated, with each face part visible in the window.

Animations!

A first animation of the roller coaster has now been made using the physics of the Unity engine.
Some small tricks went into making this. During the first attempt to make this animation, some simple collision was put on the wheels of the cart while also using the mesh of the track as its own collision. The cart got stuck constantly so it didn't work out well.

For the current animation, the track has been given a slightly simpler collision mesh by removing the middle part of the original meshin maya.

The track mesh without the center part of the track in Maya.
This was then used as the collision for the track's GameObject in Unity

The track in Unity. The green highlight is the object's collision.
Continuing, The carts' collisions had to work well with this. In order to not have any edges that easily could get caught on the smaller edges of the track, the carts got four spheres as their colliders. Sphere collision is also very fast to calculate which could make the performance better. Two spheres above the rails and two are below the rails of the track to make sure that the cart neither jumps off nor falls through the track. The spheres are all in between the track's two collision rails, making it impossible to go off the track.

Cart and track in Unity with their collisions highlighted in green.
Finally, several carts were connected using spring joints and all present physics materials were given a friction of 0. A force was then added to the carts to accelerate them and a small force was kept on the carts so they wouldn't lose their momentum. This gave the following result:

Animation of the roller coaster using Unity physics.

måndag 4 juli 2016

Cart undercarriage and alternative cart design

The undercarriage was modeled to look similar to the cart found in the design template. The undercarriage consists of four connections between the cart and the track, where each connection has of six wheels that surround the rail in three directions; above, outwards and below. There is also a shock absorber mounted below the head of the cart.

Our cart design template. (source: http://www.coastergallery.com/2009/LaR60.html)
The model for the "wheel" was created by extruding faces from a square primitive until we got the sought after shape that lets the six wheels align correctly with the rail of the track.

Model design for the rail connections of the cart.
The four wheels were places under the cart, attached to the rest of the undercarriage (a simple cube) that also features the shock absorber. The absorber consists of two cylinders, each with a small line indentation around the middle of the cylinder for looks. 

The undercarriage of the cart.
A second design for the cart was also created. It is a variation of the cart that will be at the head of the roller coaster, and will not feature the aerodynamic head. It was created by copying the rear part of the cart and placing it in the front, resizing its width so that both rows of chairs have the same amount of legroom and distance to the handlebars. In order to flip the copied rear half of the cart, we scaled it negatively in the appropriate axis. This changes the normals for the surface, so in order for any future textures to show up on the right side of the surface the normals of half the model were reversed. The final look for both carts can be seen below.

Front and rear cart models.